1️⃣ JWT
✅ JWT

JWT, 즉 Json Web Token은 인증과 정보 교환을 위해 설계된 컴팩트하고 자가 수용적인 방식의 토큰임
이느 헤더(Header), 페이로드(Payload), 그리고 서명(Signature)의 세 부분으로 구성됨.
- 헤더(Header): 헤더는 토큰의 유형(JWT)와 사용된 해싱 알고리즘(예: HMAC SHA256)을 정의함
- 페이로드(Payload): 페이로드는 토큰에 담길 데이터를 포함, 데이터는 Claim이라 부르며 Key, Value값으로 구성됨
- 서명(Signature): 서명은 토큰이 변조되지 않음을 보증함, 서버의 비밀 키를 사용해 헤더와 페이로드를 서명함
✅ JWT 흐름
- 클라이언트가 사용자 인증 정보로 로그인 요청
- 서버는 인증 정보를 검증하고 JWT 토큰 생성
- 클라이언트는 받은 토큰을 저장하고, 요청시 헤더에 포함
- 서버는 요청에 포함된 토큰을 검증하고 요청 처리
✅ JWT 구현코드
// JWT 토큰 생성
public String createToken(Authentication authentication) {
    String authorities = authentication.getAuthorities().stream()
            .map(GrantedAuthority::getAuthority)
            .collect(Collectors.joining(","));

    long now = (new Date()).getTime();
    Date validity = new Date(now + this.tokenValidityInMilliseconds);

    return Jwts.builder()
            .setSubject(authentication.getName())
            .claim("auth", authorities)
            .signWith(key, SignatureAlgorithm.HS512)
            .setExpiration(validity)
            .compact();
}

// JWT 토큰 검증
public boolean validateToken(String token) {
    try {
        Jwts.parserBuilder().setSigningKey(key).build().parseClaimsJws(token);
        return true;
    } catch (JwtException | IllegalArgumentException e) {
        return false;
    }
}
✅ 오해
- JWT는 암호화 되어 있다?
-
더보기❌, 암호화가 아닌 서명된 토큰일 뿐, 즉 인코딩 된 데이터를 디코딩하면 누구나 데이터를 볼 수 있음
-
- JWT 모든 데이터를 넣어도 된다
-
더보기❌, JWT 토큰 내부정보는 누구든 확인 할 수 있기 때문에 중요한 정보는 넣어선 안됨
-
- JWT를 사용하면 보안이 다 된다
-
더보기❌, JWT토큰은 기본적으로 "누가 이 토큰을 만들었는지"에 대한 사실만 적혀 있음 ➡ 내가 만들었으니 토큰 내부 정보를 믿을수 있구나!
-
2️⃣ Spring Security
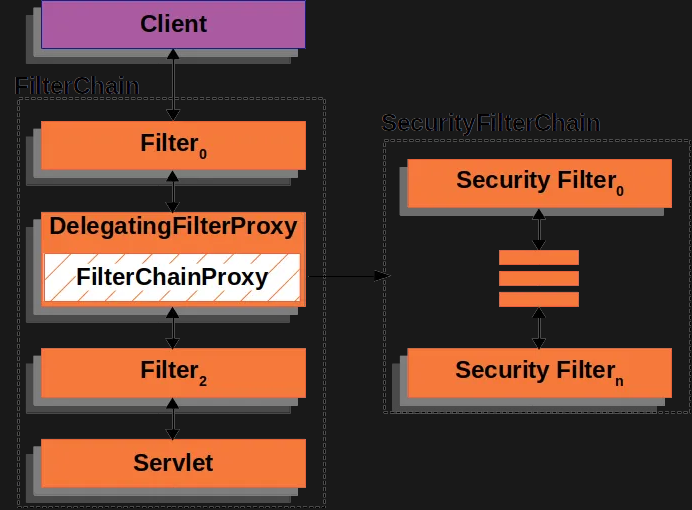
Dispatch Servlet이 앞에서 작동한다고 인지 ( SecurityFilterChain ) ⭐
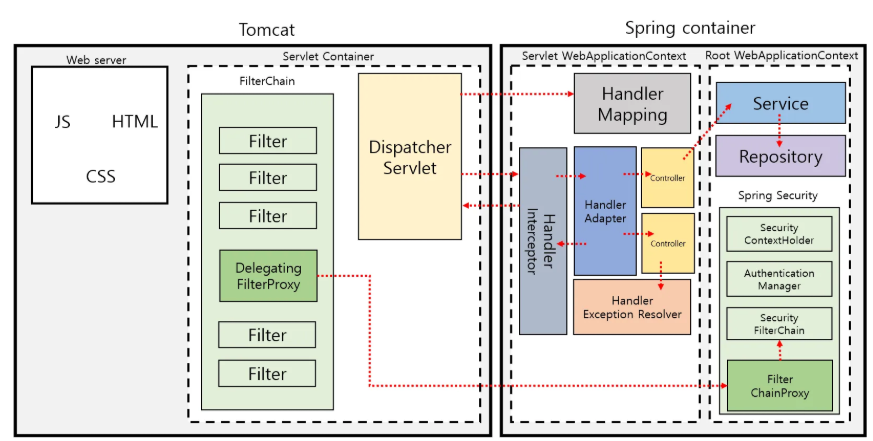

Tomcat은 Web Server이다. 정적메소드(html, css, js)가 해당
Spring Container는 WAS ( Web Application Server )이다. WAS는 백엔드 서버가 들어가 있는것으 말함.
⭐ SecurityContextHolder는 사람을 특정하는 인증을 말함. AuthenticationManager는 어떤 인증방식으로 인증을 할지
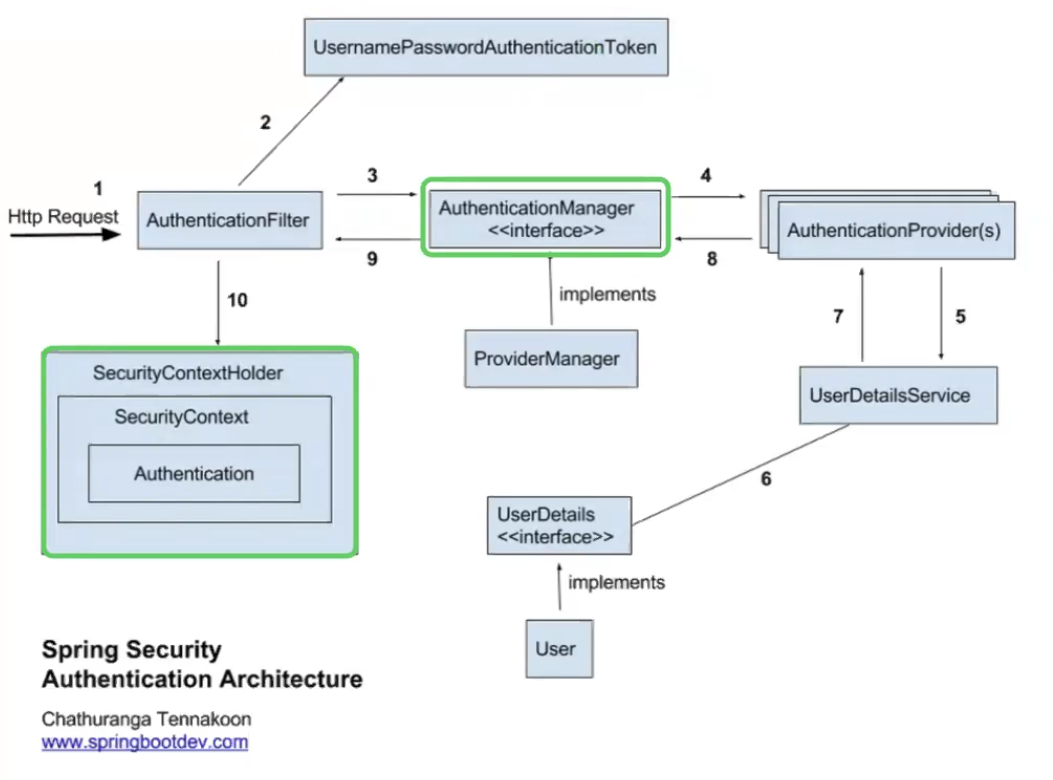
AuthenticationManager 우리가 구현한 로그인 구현체로 가줌.
AuthenticationProvider 로그인 방식 추가
Authentication 내에는 UserDetails 정보가 들어가 있음.
SecurityContextHolder에 값이 잘 들어가 있으면 정상적인 인증이 된다.
✅ 개요
Spring Security는 Spring 기반 애플리케이션의 인증(Authentication)과 권한 부여(Authorization)를 담당하는 강력한 보안 프레임워크임. 웹 애플리케이션, RESTful API 및 기타 애플리케이션 유형에 대한 포괄적인 보안 솔루션을 제공
주요 특징
- 인증(Authentication): 사용자 신원 확인
- 권한 부여(Authorization): 인증된 사용자가 특정 리소스에 접근할 수 있는지 확인
- 보안 취약점 방어: CSRF, XSS등으로 부터 보호
- 다양한 인증 방식 지원: 폼 로그인, HTTP Basic, OAuth2, JWT 등
- 메소드 수준 보안: 특정 메소드 호출에 대한 권한 체크
- 시큐리티 컨텍스트 전파: 쓰레드간 보안 컨텍스트 전파
✅ 개념 설명
인증(Authentication)
인증은 사용자가 자신이 주장하는 사람인지 확인하는 과정입니다.
Spring Security에서는 AuthenticationManager가 인증을 담당, 실제 인증 로직은 AuthenticationProvider에서 수행합니다.
지금은 컨트롤러에서 service를 직접 만들어 구현했습니다
Controller에서 AuthenticationManager 사용하는 방법
@RestController
@RequestMapping("/api/auth")
public class AuthController {

    private static final Logger log = LoggerFactory.getLogger(AuthController.class);

    private final JwtTokenProvider tokenProvider;
    private final AuthenticationManager authenticationManager;

    public AuthController(JwtTokenProvider tokenProvider, AuthenticationManager authenticationManager) {
        this.tokenProvider = tokenProvider;
        this.authenticationManager = authenticationManager;
    }

    /**
     * 사용자 로그인 처리 및 JWT 토큰 발급
     *
     * 1. UsernamePasswordAuthenticationToken 생성 (인증 요청 객체)
     * 2. AuthenticationManager에 인증 위임
     *   2.1. AuthenticationManager는 등록된 AuthenticationProvider를 찾음
     *   2.2. DaoAuthenticationProvider가 UserDetailsService를 통해 사용자 정보 조회
     *   2.3. PasswordEncoder를 사용하여 비밀번호 검증
     * 3. 인증 성공 시 Authentication 객체 반환
     * 4. SecurityContext에 인증 객체 저장
     * 5. JWT 토큰 생성 및 반환
     */
    @PostMapping("/login")
    public ResponseEntity<?> login(@RequestBody LoginRequest loginRequest) {
        try {
            log.debug("로그인 시도: {}", loginRequest.getUsername());

            // 1. UsernamePasswordAuthenticationToken 생성 (인증되지 않은 상태)
            UsernamePasswordAuthenticationToken authenticationToken =
                new UsernamePasswordAuthenticationToken(loginRequest.getUsername(), loginRequest.getPassword());

            // 2. AuthenticationManager에게 인증 위임
            // - AuthenticationManager는 UserDetailsService를 호출하여 DB에서 사용자 조회
            // - 조회된 사용자 정보와 입력된 비밀번호를 PasswordEncoder로 검증
            Authentication authentication = authenticationManager.authenticate(authenticationToken);

            // 3. 인증 성공 시 SecurityContext에 인증 객체 저장
            SecurityContextHolder.getContext().setAuthentication(authentication);

            // 4. JWT 토큰 생성
            String jwt = tokenProvider.createToken(authentication);
            log.debug("로그인 성공: {}, 토큰 발급됨", loginRequest.getUsername());

            // 5. 응답 생성
            Map<String, Object> response = new HashMap<>();
            response.put("token", jwt);
            response.put("username", authentication.getName());

            return ResponseEntity.ok(response);
        } catch (BadCredentialsException e) {
            // 자격 증명 오류 (잘못된 사용자명 또는 비밀번호)
            log.warn("로그인 실패 - 잘못된 자격 증명: {}", loginRequest.getUsername());
            Map<String, String> error = new HashMap<>();
            error.put("error", "Invalid username or password");
            return ResponseEntity.status(HttpStatus.UNAUTHORIZED).body(error);
        } catch (AuthenticationException e) {
            // 기타 인증 오류
            log.warn("로그인 실패 - 인증 오류: {}, 원인: {}", loginRequest.getUsername(), e.getMessage());
            Map<String, String> error = new HashMap<>();
            error.put("error", "Authentication failed: " + e.getMessage());
            return ResponseEntity.status(HttpStatus.UNAUTHORIZED).body(error);
        }
    }
@Service
public class CustomUserDetailsService implements UserDetailsService {
private final UserRepository userRepository;
public CustomUserDetailsService(UserRepository userRepository) {
this.userRepository = userRepository;
}
@Override
@Transactional(readOnly = true)
public UserDetails loadUserByUsername(String username) throws UsernameNotFoundException {
User user = userRepository.findByUsername(username)
.orElseThrow(() -> new UsernameNotFoundException("사용자를 찾을 수 없습니다: " + username));
// 사용자 정보를 Spring Security가 이해할 수 있는 UserDetails 객체로 변환
return org.springframework.security.core.userdetails.User.builder()
.username(user.getUsername())
.password(user.getPassword()) // 이미 암호화된 비밀번호
.disabled(!user.isEnabled())
.accountExpired(false)
.accountLocked(false)
.credentialsExpired(false)
.authorities(user.getRoles().stream()
.map(role -> new SimpleGrantedAuthority("ROLE_" + role))
.collect(Collectors.toList()))
.build();
}
}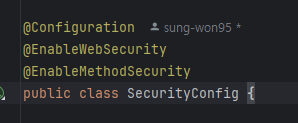
SecurityConfig에 SecurityFilterChain을 잘 구현하는게 제일 중요 ⭐
권한 부여(Authorization)
권한 부여는 인증된 사용자가 특정 리소스에 접근할 수 있는지 결정하는 과정
URL 패턴, 메소드 호출 등에 대한 접근 제어를 구성할 수 있음.
http
    .authorizeHttpRequests(authorize -> authorize
        .requestMatchers("/", "/home", "/css/**", "/js/**", "/h2-console/**").permitAll()
        .requestMatchers("/api/authenticate").permitAll()
        .requestMatchers("/admin/**").hasRole("ADMIN")
        .anyRequest().authenticated()
    )
보안 컨텍스트(Security Context)
SecurityContext는 현재 인증된 사용자의 정보를 저장함. SecurityContextHolder를 통해 애플리케이션 어디서나 현재 인증된 사용자 정보에 접근할 수 있음.
Authentication auth = SecurityContextHolder.getContext().getAuthentication();
String username = auth.getName();
보안 관련 코드
CSRF(Cross-Site Request Forgery) 보호
CSRF는 인증된 사용자가 자신도 모르게 공격자가 의도한 행동을 수행하도록 하는 공격입니다. Spring Security는 기본적으로 CSRF 보호 기능을 제공
// CSRF 보호 구성 (H2 콘솔과 API 요청은 제외)
.csrf(csrf -> csrf
    .ignoringRequestMatchers("/h2-console/**", "/api/**")
)
CSRF 보호는 Thymeleaf 템플릿에서 th:action 속성을 사용할 때 자동으로 CSRF 토큰이 포함
<form th:action="@{/login}" method="post">
    <!-- CSRF 토큰이 자동으로 포함됨 -->
</form>
세션 관리
Spring Security는 세션 고정 공격, 동시 세션 제어 등 다양한 세션 관리 기능을 제공
// 세션 관리 설정
.sessionManagement(session -> session
    .sessionCreationPolicy(SessionCreationPolicy.STATELESS) // JWT 사용 시
    // .maximumSessions(1)   // 동시 세션 제한
    // .sessionFixation().migrateSession()  // 세션 고정 공격 방지
)
메소드 레벨 보안
메소드 호출에 대한 보안 설정을 어노테이션으로 구현할 수 있습니다.
@PreAuthorize("hasRole('ADMIN')")
public List<User> getAllUsers() {
    return userRepository.findAll();
}

@PostAuthorize("returnObject.username == authentication.name")
public User getUserById(Long id) {
    return userRepository.findById(id).orElse(null);
}
✅ OAuth2 인증 구현법
OAuth2 의존성 추가
<dependency>
    <groupId>org.springframework.boot</groupId>
    <artifactId>spring-boot-starter-oauth2-client</artifactId>
</dependency>
OAuth2 설정
// SecurityConfig.java에 추가
.oauth2Login(oauth2 -> oauth2
    .loginPage("/login")
    .defaultSuccessUrl("/dashboard")
    .userInfoEndpoint(userInfo -> userInfo
        .userService(customOAuth2UserService)
    )
)
# application.properties에 추가
spring.security.oauth2.client.registration.google.client-id=your-client-id
spring.security.oauth2.client.registration.google.client-secret=your-client-secret
spring.security.oauth2.client.registration.google.scope=profile,email
spring.security.oauth2.client.registration.github.client-id=your-github-client-id
spring.security.oauth2.client.registration.github.client-secret=your-github-client-secret💡 TIP!
1️⃣ 개인환경 설정 편하게 (H2 DB사용)
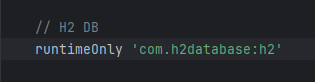
H2 DB를 사용하면서 가상의 테이블을 만들어서 바로 프로그램이 실행되게 편하게 할수 있음
2️⃣ Postman 대신 인텔리제이로 실행
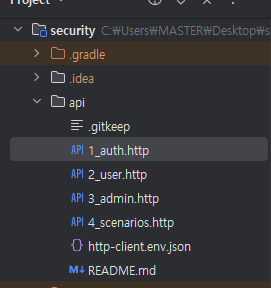
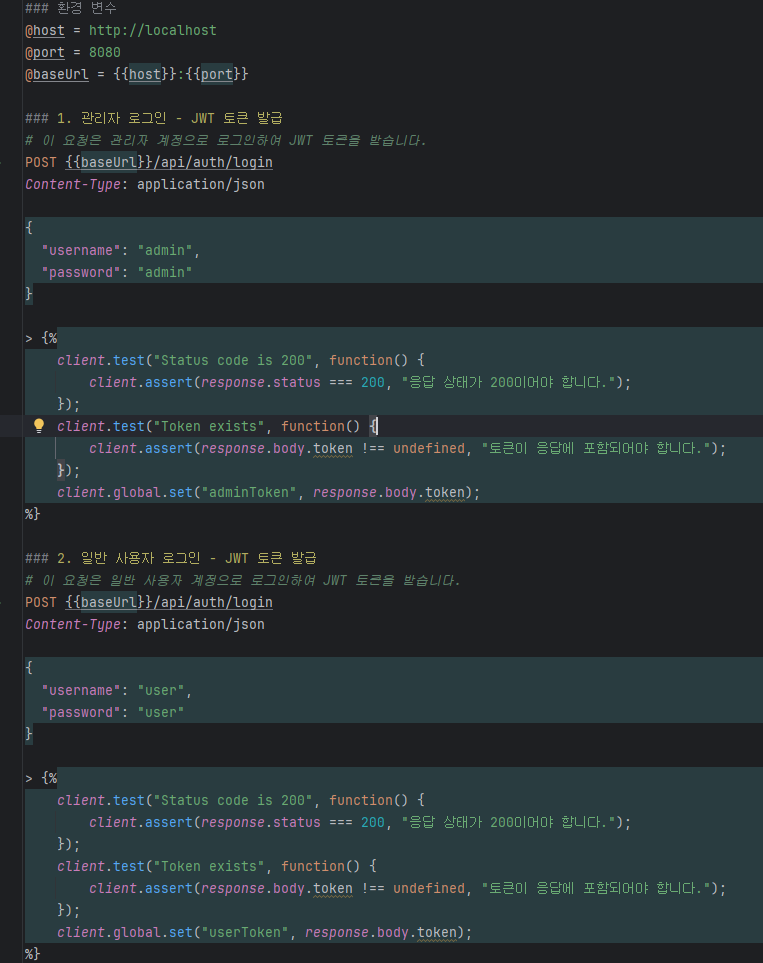
2025.05.06 - [[내일배움캠프-Sparta]/Spring 6기 ( + TIL )] - ⚓Spring Security ( 스탠다드 )
⚓Spring Security ( 스탠다드 )
1️⃣ Spring Security 란?Spring 기반 애플리케이션의 보안을 담당하는 프레임워크인증, 인가, CSRF, 세션 관리, 비밀번호 암호화 등 다양한 기능 제공2️⃣ 동작 흐름기본적으로 Servlet Filter 기반으로
dimenshun.tistory.com
'[내일배움캠프-Sparta] > Spring 6기' 카테고리의 다른 글
| 테스트 코드 (단위 테스트) ( 스탠다드 ) (0) | 2025.05.11 |
|---|---|
| TIL 53 [ JPA 심화 플러스 과제 ( Lv2 ) ] (0) | 2025.05.09 |
| TIL 51 [ JPA 심화 플러스 과제( Lv 1 ), AWS (입문, IAM) ] (0) | 2025.05.07 |
| 테스트 코드 ( 베이직 ) (0) | 2025.05.06 |
| ⚓Spring Security ( 스탠다드 ) (0) | 2025.05.06 |