16:00 ~ 17:00 미니세션 ( 예외처리, 박성원 튜터님 )
📣 Spring 일정 관리앱 (JPA)
✅ Lv 0
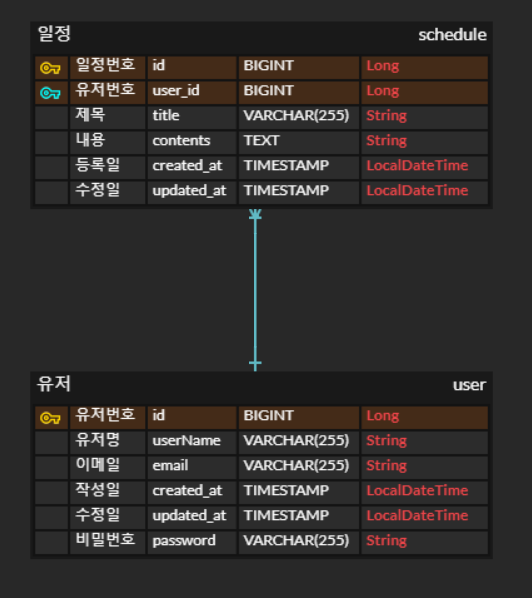
API, ERD는 개발 과정에서도 계속 바뀔 수 있기 때문에 포스팅일 기준으로 나타내고 있습니다.
SQL문은 JPA가 작성해주기 때문에 따로 작성하지는 않았다.
✅ Lv 1 ( 일정 CRUD )
※ Entity와 Dto는 있다고 가정하고 작성하겠습니다.
프로젝트 Application에 @EnableJpaAuditing을 선언해주어야 한다.
@EnableJpaAuditing
@SpringBootApplication
public class SchedulerProjectV2Application {

    public static void main(String[] args) {
        SpringApplication.run(SchedulerProjectV2Application.class, args);
    }

}
Repository는 하나로 다룬다.
JpaRepository에 상속받으면서 관리되며, <"Entity", "식별자 타입"> 이 와야 한다.
default 메소드로 작성시 인터페이스 내 구현체를 작성할수 있으며, 처리를 통해 Optional로 예외처리를 하는경우를 생략하게 하여 코드량을 줄였다.
public interface ScheduleRepository extends JpaRepository<Schedule, Long> {

    // 실습 했던거 참고. (예외처리)
    default Schedule findByIdOrElseThrow(Long id) {
        return findById(id).orElseThrow(() -> new ResponseStatusException(HttpStatus.NOT_FOUND, "존재하지 않는 id = " + id));
    }
}
⚡ 생성
Controller
@RestController
@RequestMapping("/api/schedules")
@RequiredArgsConstructor
public class ScheduleController {

    private final ScheduleService scheduleService;

    // 일정 생성
    @PostMapping
    public ResponseEntity<ScheduleResponseDto> addSchedule(@RequestBody CreateScheduleRequetsDto requetsDto) {

        ScheduleResponseDto responseDto = scheduleService.addSchedule(requetsDto.getTitle(), requetsDto.getUserName(), requetsDto.getContents());

        return new ResponseEntity<>(responseDto, HttpStatus.CREATED);
    }
Service ( Lv2 에 먼저 접근함.. )
// 일정 생성
@Override
public ScheduleResponseDto addSchedule(Long id, String title, String contents, String requetsDtoContents) {

    // 튜터님의 새로운 예외처리 방법 !! Optional 예외처리 하는법 대체
    Member member = memberRepository.findById(id).orElseThrow(
            () -> new RuntimeException("Not Found Member" + id)
    );

    Schedule schedule = new Schedule(title, contents, member);

    Schedule addSchdule = scheduleRepository.save(schedule);

    return new ScheduleResponseDto(addSchdule.getId(), addSchdule.getTitle(), addSchdule.getMember().getUserName() , addSchdule.getContents());
}
생성의 경우 id값이 없기때문에 데이터를 생성하겠다는 요청 값을 받아주며, 객체를 새로 생성하여 그 값을 저장하여 생성 할수 있다. 여기서 id값은 Member와 연관관계를 맺고 있기 때문에 Member의 id값을 불러오는 용도로 이해하면 된다.
⚡ 전체조회
Controller
// 일정 전체 조회
@GetMapping
public ResponseEntity<List<ScheduleResponseDto>> findAll() {

    List<ScheduleResponseDto> responseDtoList = scheduleService.findAll();

    return new ResponseEntity<>(responseDtoList,HttpStatus.OK);
}
Service
// 일정 전체 조회
@Override
public List<ScheduleResponseDto> findAll() {

    return scheduleRepository.findAll()
            .stream()
            .map(ScheduleResponseDto::toDto)
            .toList();
}
전체 조회 같은경우에는 보통 리스트 형태로 나타내는 것이 일반적이다. List<E> 를 활용하고, id값은 요청 받을 필요가 없다. 그래서 .findAll() 메소드를 활용해 모두다 부르며, stream() 형태로 만들고 .map(ScheduleResponse::toDto) 형태로 entity에 저장된 toDto 메소드를 불러와 그 결과값을 toList() 리스트 형태로 반환한다.
⚡ 단건조회
Controller
// 일정 단건 조회
@GetMapping("/{id}")
public ResponseEntity<ScheduleResponseDto> findAllById(@PathVariable Long id) {

    ScheduleResponseDto responseDto = scheduleService.findById(id);

    return new ResponseEntity<>(responseDto,HttpStatus.OK);
}
Service
// 일정 단건 조회
@Override
public ScheduleResponseDto findById(Long id) {

    Schedule findSchedule = scheduleRepository.findByIdOrElseThrow(id);

    return new ScheduleResponseDto(findSchedule.getId(), findSchedule.getTitle(), findSchedule.getMember().getUserName(), findSchedule.getContents());
}
단건 조회는 이미 저장되어 있는 데이터 id값을 조회해서 해당하는 id값을 변수로 저장하여 .get메소드를 이용해 하나의 필드를 다 불러 오는 씩으로 하였다.
⚡ 수정
Controller
// 일정 수정
@PutMapping("/{id}")
public ResponseEntity<String> update(
        @PathVariable Long id,
        @RequestBody UpdateRequestDto requestDto
) {
    String requestUpdate = scheduleService.update(id, requestDto.getTitle(), requestDto.getContents());

    return new ResponseEntity<>(requestUpdate,HttpStatus.OK);
}
Service
// 일정 수정
@Transactional // 도 가능함. ( 영속성 컨텍스트 ?? ) . . . 트랜잭션 단위를 잡는역할?
@Override
public String update(Long id, String title, String contents) {

    Schedule findSchedule = scheduleRepository.findByIdOrElseThrow(id);

    findSchedule.update(title,contents);

    //scheduleRepository.save(findSchedule);

    return "일정이 성공적으로 수정되었습니다.";
}
수정은 단건 조회와 마찬가지로 이미 저장되어있는 id값을 가져와서 변수로 저장한후 Schedule Entity의 update 메소드를 이용해서 변경하는 값을 만들어준다. 이때 2가지의 방법으로 나뉜다.
1. @Transactional을 이용한 영속성 컨텍스트에서 변경감지라는 특성을 이용한 변경 방법
2. save 메소드를 이용해 직접 변경한값을 담아서 저장해준다.
⚡ 삭제
Controller
// 일정 삭제
@DeleteMapping("/{id}")
public ResponseEntity<String> delete(@PathVariable Long id) {

    String requestDelete = scheduleService.delete(id);

    return new ResponseEntity<>(requestDelete,HttpStatus.OK);
}
Service
// 일정 삭제
@Override
public String delete(Long id) {

    Schedule findSchedule = scheduleRepository.findByIdOrElseThrow(id);

    scheduleRepository.delete(findSchedule);

    return "일정이 성공적으로 삭제되었습니다.";
}
삭제가 제일 간단했다. 기존에 있던 Id값을 찾아서 delete 메소드로 삭제 처리해주면 간단하게 삭제 되었다.
💥 예외처리 (미니세션)
✅ Java에서의 예외처리 방식 (try - catch문, throws)
try-catch
- try-catch 구문으로 예외를 처리하거나, throws 키워드로 상위 메서드로 예외를 던질 수 있습니다.
public String someMethod() {
    try {
        // 예외가 발생할 수 있는 코드
    } catch (Exception e) {
        // 예외 처리
    }
    return "Done";
}- 간단하지만, Spring MVC 같은 웹 애플리케이션에서 발생하는 예외를 획일적으로 다루기 어렵다는 단점이 있습니다.
- 예외가 발생할 때마다 각각의 try-catch를 배치하면
코드가 복잡해지고, 에러 페이지 표시나 로깅, 공통된 에러 메시지 처리 등이 중구난방이 될 수 있습니다.
✅ Servlet 컨테이너와 Spring MVC 예외 처리 흐름
Servlet 컨테이너의 예외 처리
- Spring MVC는 기본적으로 Servlet 기반에서 동작합니다.
- 클라이언트(브라우저)가 요청을 보내면, Servlet 컨테이너(Tomcat, Jetty 등)가 해당 요청을 받고, 내부적으로 Spring DispatcherServlet이 이를 받아 Controller로 전달합니다.
- Controller에서 예외가 발생하면 기본적으로 Spring 내부에서 이를 처리하거나, 더 이상 처리할 수 없는 경우 최종적으로는 Servlet 컨테이너가 에러 페이지를 보여주게 됩니다.

✅ @ExceptionHandler의 기본 개념
@ExceptionHanlder ?
- Controller 내에서 특정 예외를 직접 핸들링하기 위한 Spring 애노테이션입니다.
- 메서드에 붙여서, “이 메서드는 이러한 예외가 발생했을 때 동작해라!” 라고 알려주는 역할을 합니다.
@Controller
public class SampleController {

    @GetMapping("/test")
    public String testMethod() {
        // 예시로 NPE(NullPointerException)가 발생한다고 가정
        String data = null;
        int length = data.length(); // 여기서 예외 발생
        return "testView";
    }

    // NPE가 발생했을 때 처리하는 메서드
    @ExceptionHandler(NullPointerException.class)
    public String handleNullPointerException(NullPointerException e) {
        System.out.println("NullPointerException 발생: " + e.getMessage());
        return "error/nullPointerError";
        // "error/nullPointerError" 라는 뷰로 이동한다고 가정
    }
}
@ResponseStatus와 함께 쓰는 경우
- 종종 예외에 따라 HTTP 상태 코드를 함께 변경해야 할 때가 있습니다.
- 예: 404(Not Found), 400(Bad Request) 등을 명시적으로 표시하고 싶다면, @ResponseStatus 애노테이션을 사용할 수 있습니다.
@ExceptionHandler(IllegalArgumentException.class)
@ResponseStatus(HttpStatus.BAD_REQUEST)
public String handleIllegalArgumentException(IllegalArgumentException e) {
    return "error/badRequestError";
}
✅ 커스텀 예외(Custom Exception)와 @ExceptionHandler 연동
커스텀 예외를 만드는 이유
- REST API나 웹 애플리케이션을 만들다 보면, 특정 상황에서만 발생하는 예외를 별도로 구분하고 싶을 때가 있습니다.
- 예: “사용자 정보가 존재하지 않는다.”, “권한이 부족하다.” 등등, 비즈니스 로직에서 중요한 예외를 나타내기 위해 커스텀 예외를 만들 수 있습니다.
'[내일배움캠프-Sparta] > Spring 6기' 카테고리의 다른 글
| TIL 33 [ 과제 끝 + 스탠다드반 ( 영속성 컨텍스트 ) ] (0) | 2025.04.04 |
|---|---|
| TIL 32 [ Spring 일정관리 앱 Lv2~5 ] (0) | 2025.04.04 |
| TIL 30 [ Spring ( Data JPA ), 스탠다드반 ( Optional ) ] (0) | 2025.04.01 |
| TIL 29 [ Spring ( Filter, 객체와 RDB, JPA , 영속성 컨텍스트, Entity 제작 ) ] (0) | 2025.03.31 |
| Spring ( Session, Token, JWT ) (0) | 2025.03.30 |